

Photoshop Tips: Textures, Patterns, and Gradients - petersonairming1965
Some of the greatest features in Photoshop are the textbook, object, and image effects much as Textures, Patterns, Gradients, and Styles.
Styles are those amazing special personal effects that you project rolling crossways the blind on movie titles and popping hit leger covers, posters, and billboards. They are made from textures and gradients, additionally to schoolbook, shapes, photos, illustrations, and other objects, plus loads of colours and special effects. Styles make water text and objects beautiful, chilling, outrageous, fantastic, and flatbottomed scary.
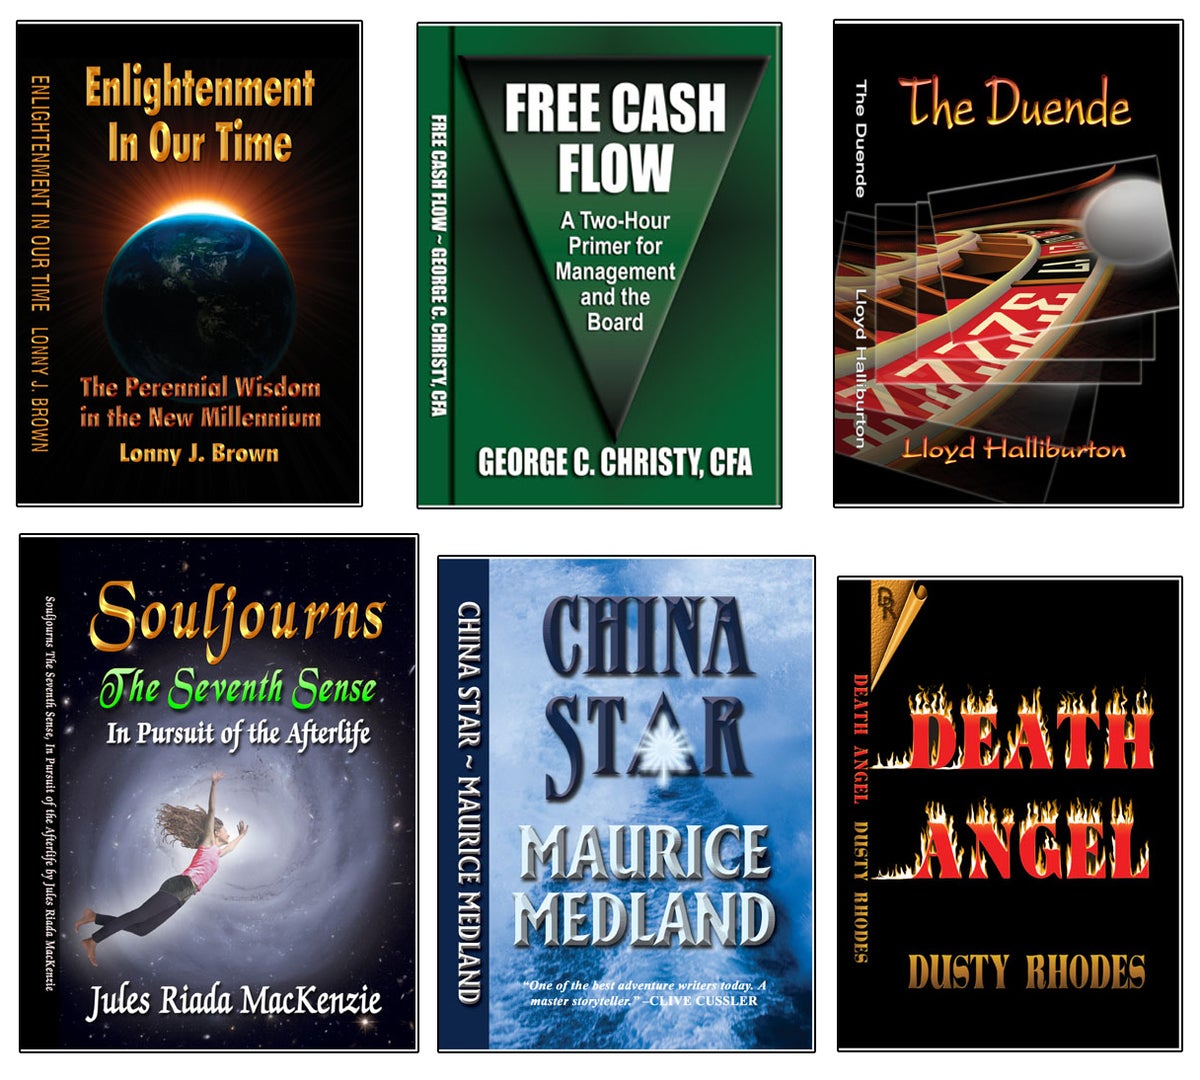
Check out these book covers I created for several published authors. You can do this, too. Lease's dive in and create roughly awe-inspiring textures, patterns, and gradients.
 JD Sartain
 Book covers with PS Patterns, Gradients, Textures, Styles, and effects
Setting up your document
First, rent's open a file, add more or less text, so destination each feature individually.
1. Surface Photoshop and create a new file (File > New). Confirm your settings for Inches, Width, Height, and Orientation from the Preset Inside information panel.
Tip: Always start with a high-resolution image (minimum 300 pixels per inch) regardless of the final product. You can always reduce file in size without degrading image quality; you cannot enlarge it.
2. Choose the Type tool and enter a line of text.
Tip: In the world of design and typography, type characters are called typefaces. The various attributes (unfearing, Italic language, constrict, etc.) enclosed in the face package are called fonts. For future mention, enter the typeface, font, sized, and coloring before you make up your textbook box. It's easier and saves time.
3. I entered the words Park City, using the Impact fount, Fixture font (as opposed to bold, italic, extended, etc.), size 100 points, and Machine ahead along an 8×8 canvas.
Note: If your text box mechanically fills with a paragraph of Latin text, don't panic–that's just placeholder schoolbook you can easily remove. Select Delete > Preferences > Type, then uncheck the package that says Fill new typewrite layers with placeholder text.
4. If not already visible on the screen, open the Layers, Style, Paragraph, and Persona panels. Combine Paragraph and Character into 1 empanel, and the Layers and Styles into other board. Open the Patterns and Gradients panel, then remove Swatches and Coloring. Those are unessential, because all you have to do is double-snap the Foreground/Background signal color squares (in the Tools impanel) to find/function the Color Picker and Color Libraries.
Working with Photoshop Textures
Textures in Photoshop are the same as in lifetime, leave out you can't actually touch them. You can work with designs or abstract patterns such arsenic sandpaper, brick, wood, fabric, leather, and more.
Photoshop comes with loads of great textures that you derriere apply to your text operating theatre images through the Filters menu. For example:
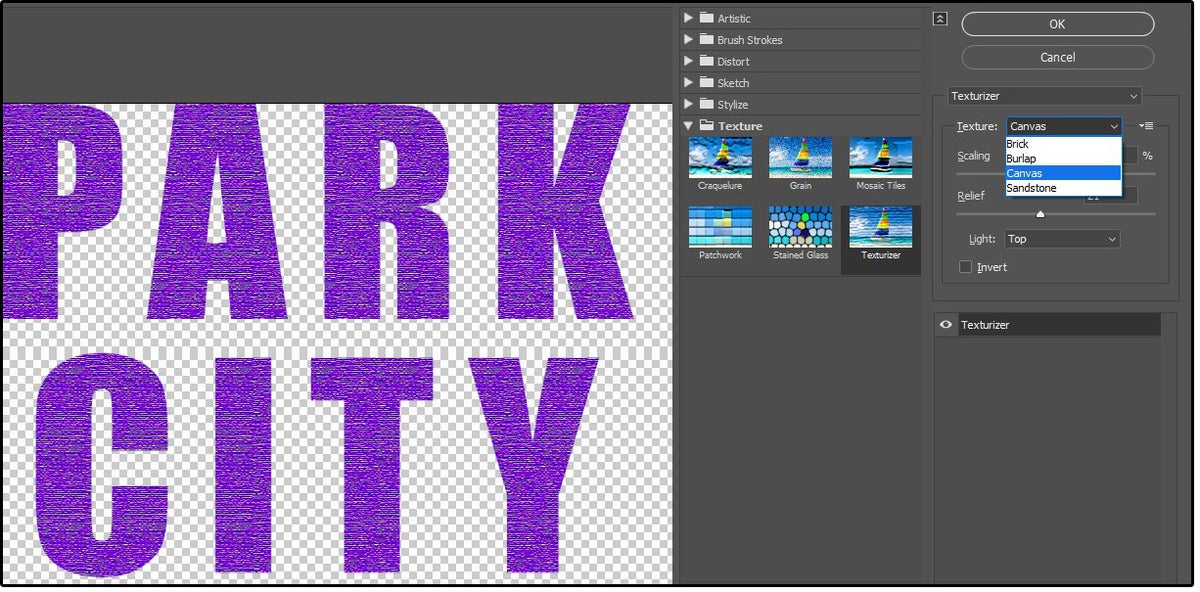
1. Select the Text bed called Park Metropolis.
2. Choose Filter > Trickle Gallery.
3. Read the pop-fly dialog and take Convert to Sharp Object.
4. The Sink in Gallery opens and displays the text bed. Click the up OR down arrows to vista the entire page on the riddle.
5. Notice the folders in the board connected the right. Click to open the Texture folder (or any other folder that interests you).
6. Browse through the Textures and select one. (I chose Texturizer.)
7. In the right hand impanel, dawn the down arrow, and choose a texture from the list. (I chose Canvas.)
8. Use the buttons down the stairs to customize the "Canvas" Texture: Scaling, Sculptural relief, Light (root), or Invert. The customize buttons are different supported the selected texture.
9. Play with the different textures and options until you'rhenium satisfied with the result, then clack OK.
You can also hold textures direct the Layers panel:
- Right-click the text layer and choose Blending Options.
- Under Bevel and Emboss clack the Bible Textures, not just the box.
- Under Texture Elements, click the down arrow beside the Patterns corner.
- All the preserved Patterns appear (in folders).
- Opt a folder, then choose a Pattern.
Photoshop ignores the colours and background of the designated pattern, leaving only the textured portions, and so overlays the pattern onto your schoolbook, object, or image.
6. You commode conform the Shell and Profoundness, or Reverse the texture.
7. When satisfied with the result, fall into place OK.
NOTE: Follow the Patterns instructions below to create custom textures through the Pattern menus.
 JD Sartain / IDG
 Photoshop Textures
Working with Photoshop Patterns
Patterns are almost the Lapp as Textures, except Patterns are smaller, repetitive designs that are tiled together to come along as a continuous surface, and they aren't necessarily rough. Patterns are more about images, although they can also be abstract design. Patterns are created, saved, and used as Layers, whereas Textures are practical as Filters.
Photoshop comes with few stock patterns that you can apply to your text or images done the Blending Options carte du jour. These are just samples. In that respect are thousands of patterns you can download for rid, or you can create your ain.
1. Rightfield-click the Text Bed titled Park Metropolis.
2. Prefer Blending Options from the drop-down menu.
3. Click or highlight the Pattern Overlay option in the left panel (you must click the words, not retributory check the box).
4. In the Pattern Overlay window (on the right) get through the down pointer beside the Normal field, then choose a folder from the list.
5. Surf through the list, superior a pattern, use the features to make custom changes, then click OK.
6. Notice how the pattern fills the words Park Urban center.
Creating custom Photoshop Patterns
You can make your own Patterns for Photoshop using pretty much some persona (to which you have visualize-use rights, course). Here's how.
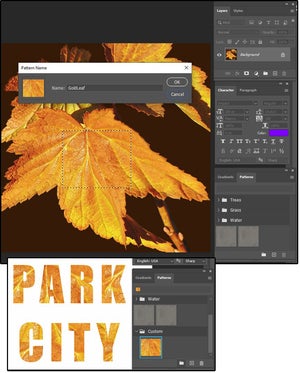
1. Open a shoot, illustration, or painting file.
2. Use the Rectangular Marquise to select a square or rectangular section of the pic.
3. Select Edit > Define Pattern.
4. Name the pattern, then click Very well.
5. Close the photograph file.
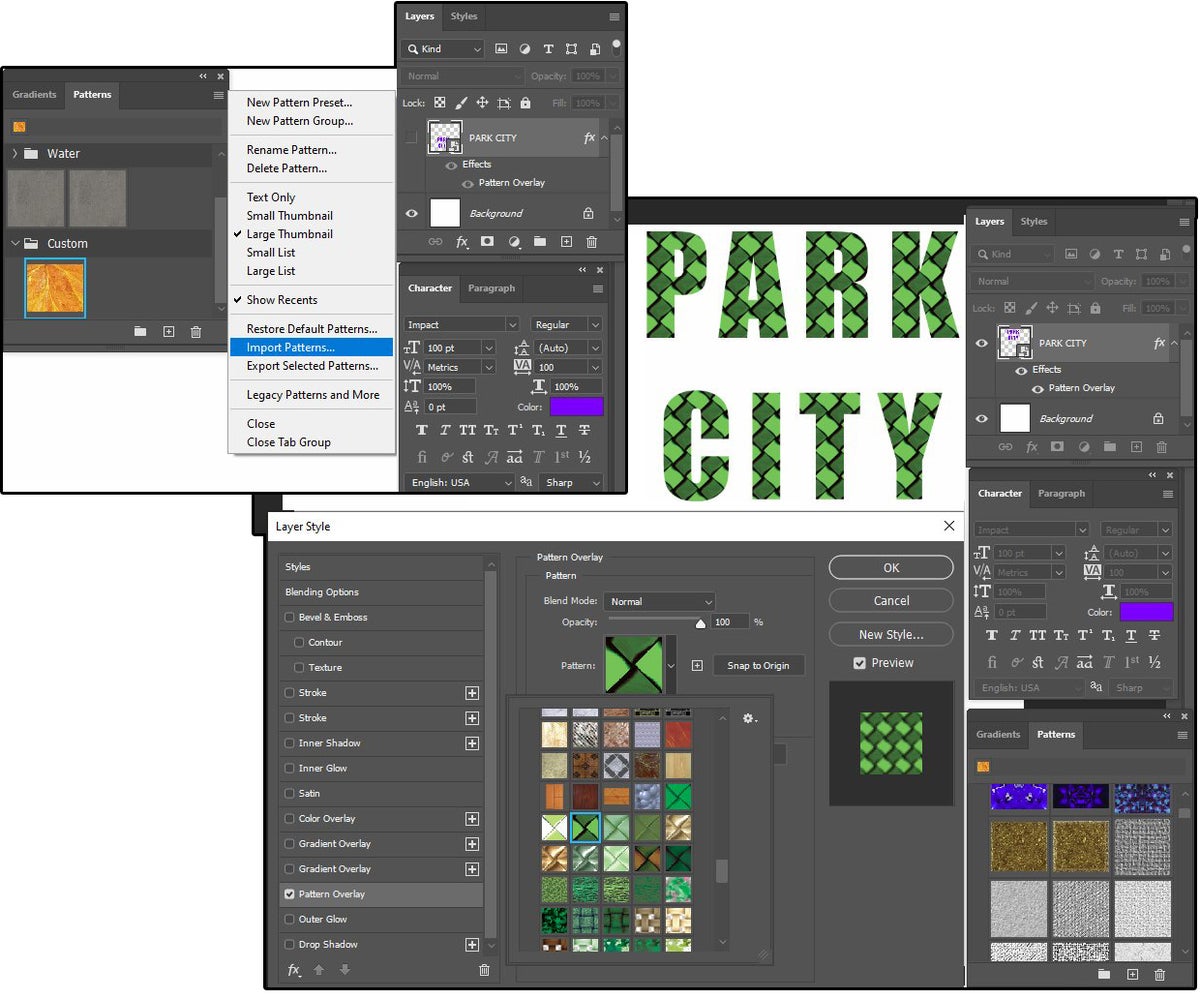
6. Right-tick the Text Layer titled Park City.
7. Choose Blend Options from the driblet-down menu.
8. Highlight the Formula Overlay option.
9. Pick out your new practice from the inclination and click OK.
10. Like a sho the Park City schoolbook is filled with gold leaf.
11. Select the pamphlet icon in the Patterns panel and enter a name for the New brochure, such as Custom.
12. Put together your cursor connected the new pattern box, hold and hale to the other brochure.
 JD Sartain / IDG
 Photoshop Patterns
Download and install free Photoshop patterns
Need more patterns? You can find an eternal supply online. Just search for "unimprisoned Photoshop patterns" and start browsing the sites that soda water up in the results.
Once you've downloaded your patterns, go to the Patterns and Gradients panel box seat and click the fare icon in the height right corner. Choose Import Patterns.
6. Navigate to the folder where you saved the downloaded patterns. Select the pattern file and click Load.
8. Notice a new folder in your Patterns panel. Click the folder to open, and so expand the window to view all of your beautiful patterns.
9. Have some fun and experiment with dozens of divers patterns on your Common City text.
 JD Sartain / IDG
 Download Photoshop Patterns
How to work with Photoshop Gradients
Gradients are a wash (or ramp) of colors that propagate crossways a palette of many a colors. Photoshop comes with a nice variety of gradients that can be put-upon as-is or bespoken to fit your project. You can likewise download thousands of third-party gradients or create your custom gradients.
1. Select the Park City text again.
2. Right-click the Layer and prefer Clear Layer Style from the drop-down menu (even though information technology was non technically a Flair).
3. Prefer Blending Options from the drop-down menu.
4. Flick or highlight the Slope Overlay pick.
5. Crop through the list of folders and click one. The gradients in that folder display.
6. Click the one you same and chatter Oklahoma, or use the options on this panel to customize the gradient you designated. For instance, there are 27 Blending Modes, you can reverse the gradient, align it with the layer, change the angle, the scale, the opaqueness, or the style: Simple, Radial, Angle, Reflected, or Diamond. You can also fuss it and, if you like it, save it as a Style.
How to make bespoke Photoshop Gradients
1. In the Gradients panel, click the Add box (it looks like a plus preindication) boxwood at the bottom center of the panel.
2. The Slope Editor dialog windowpane opens.
3. Treble-click the little boxes (left or correct) below the slipper bar, and the Colorise Picker palette opens.
4. Choose a color for apiece side.
5. Clink below the Pseudemys scripta to add more color boxes, and so choose more colors.
6. Drag the box seat down and away from the skidder bar to remove it.
7. Lantern slide the individual boxes to and fro to achieve the premium gradient result.
8. Enter a name in the Identify field box.
9. Sink in the Unaccustomed clit, then click OK.
11. Prefer Blending Options from the drop-down computer menu.
12. Click or highlight the Gradient Overlay alternative.
13. Locate your current gradient at the bottom. Select it and fall into place OK.
 JD Sartain / IDG
 Photoshop Gradients
Many tips for refining your images
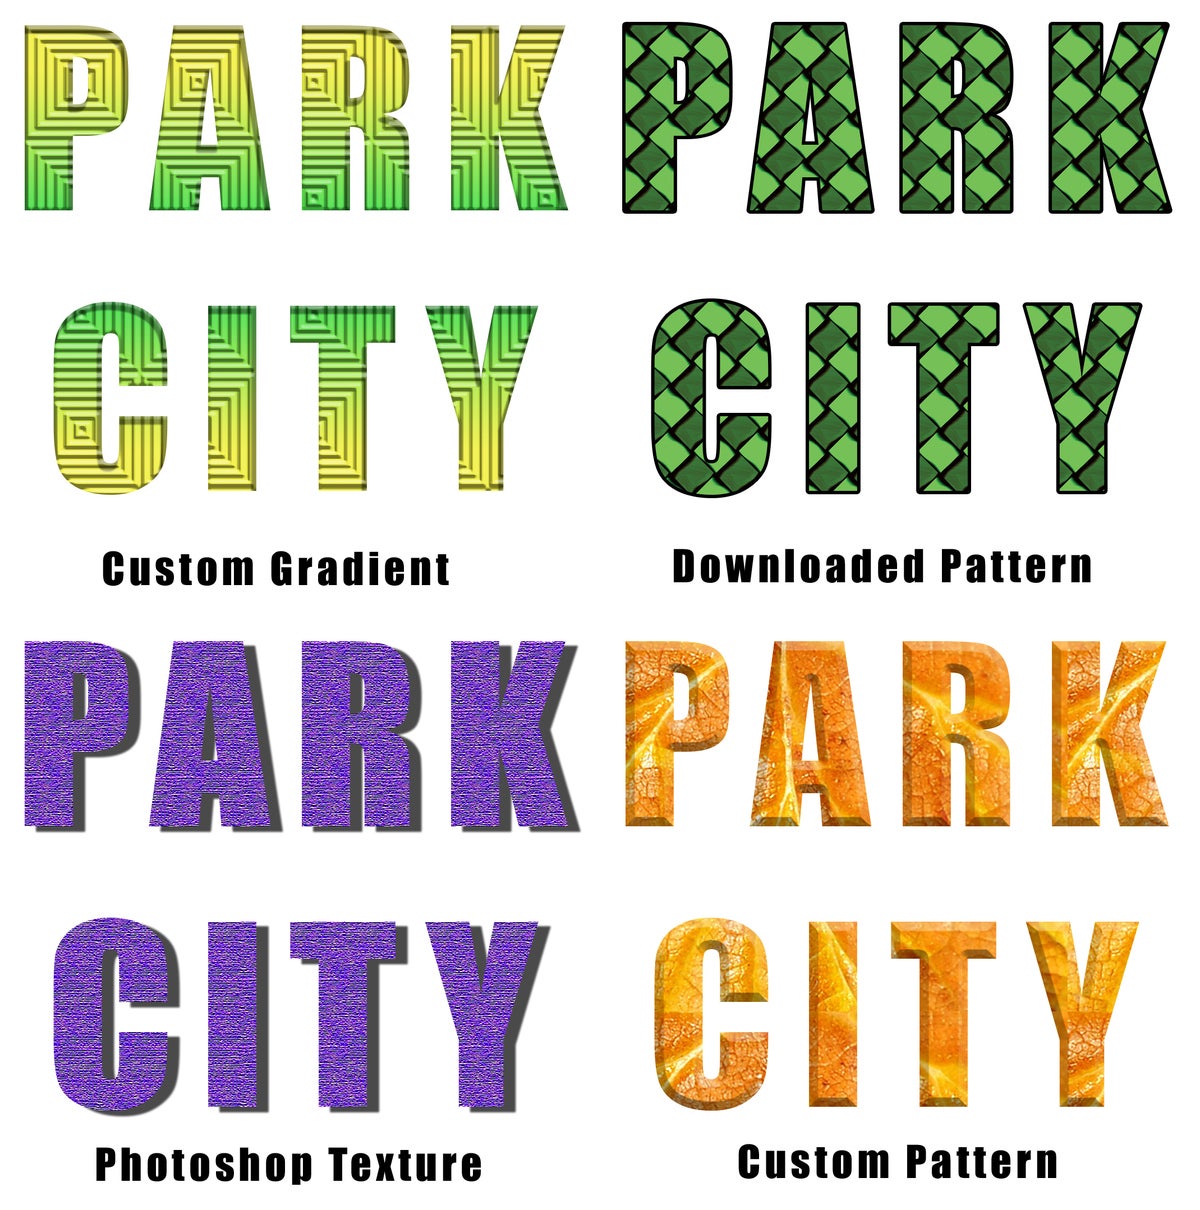
Now that you stimulate four different Park City logos, add some flare to hike up the 'wow' factor.
1. Rename the four Layers to mark which is which: Cust Pattern, Cust Slope, Download Pattern, and Photoshop Texture.
2. Select Cust Pattern, and so right-click and choose Shading Options.
3. Choose Bevel &adenosine monophosphate; Emboss > Inside Bevel > Chisel Hard. Notice the difference.
4. Select Cust Gradient, right-chatter information technology, and opt Merging Options.
5. Choose Inner Shadow > Mean, then modify the Angle.
6. Select Photoshop Texture, right-click, and choose Blending Options.
7. Choose Drop Shadow > Normal, then change the angle.
8. Superior Download Pattern, right-click, and choose Blending Options.
9. Choose Stroke > Natural > Outside > Size 6.
If you like any or all of these personal effects' combinations, you can save them as a Style. Select the stratum with the effects you want to bring through, then heart-to-heart the Mingling Options panel. On the right side, click the Raw Style release, name it, and click OK double.
 JD Sartain / IDG
 Add more specialised effects to boost the howler factor

Source: https://www.pcworld.com/article/399231/photoshop-tips-textures-patterns-and-gradients.html
Posted by: petersonairming1965.blogspot.com
0 Response to "Photoshop Tips: Textures, Patterns, and Gradients - petersonairming1965"
Post a Comment